Showing posts with label eat. Show all posts

Wednesday, December 21, 2011

My Mother-In-Law's Peanut Butter Balls

I just spent a glorious 5 days with my in-laws. And I mean that for real. I realize a lot of people aren't lucky enough to have really awesome in-laws. I am that lucky. When I go to my MIL's house, I always feel welcome and happy and stress free. It's a good change from normal life.

We always go up right before actual Christmas so we can do our celebrations with them and then be home for Santa's big visit. When I got there, we had some work to do to prepare for the festivities. One of these things was to make the Peanut Butter Balls.

We can't have Christmas up there without the Peanut Butter Balls.

While they can be a little tedious to make with regard to time, they are actually really simple to make.

Ingredients for balls*:
  • 1 1/2 cups graham cracker crumbs
  • 1 box powdered sugar
  • 1/2 cup peanut butter (we use Reese peanut butter for this)
  • 1 cup coconut
  • 1 teaspoon vanilla
  • 2 sticks margarine, melted
  • 1 cup chopped pecans
Mix all of the above together, adding the butter last. Use your hands. It's more fun.

Ingredients for chocolate:
  • 1/2 block of paraffin wax (we used Gulf Wax)
  • 1 6oz. package of semi-sweet chocolate morsels
Melt the wax and chocolate in a double boiler or pot on pot.


Pot on Pot Boiler


How to "assemble" the peanut butter balls:
Rolled Peanut Butter Balls
  • Pinch off a small amount of peanut butter mixture and roll it into a ball in the palm of your hand. It shouldn't be any wider than a quarter, really. Although, I guess the size can be up to you. We made 4 batches at once and had well over a hundred peanut butter balls. The smaller you roll, the more there are.
  • Drop each ball into the melted chocolate mixture, rolling it around until it's covered.
  • Remove the ball with a slotted spoon so the extra chocolate can drip back into the pot
  • Lay your peanut butter balls on a cookie sheet lined with wax paper so they can dry. Drying won't take long.
  • Store your peanut butter balls in a sealed container until ready to enjoy.


Chocolatey Goodness!
They are seriously sinful and yummy. All weekend, I'd watch people popping these things in their mouths. How can you not love a peanut butter ball?!


*I suspect you can leave some of these ingredients out for those who can't have, say, nuts or coconut, and these would still be just as yummy.


Monday, December 12, 2011

Chicken Pot Pie

I've been wanting to try the new Philadelphia cooking cremes since they first appeared on the shelf in the grocery store. So tonight, I put one to the test by making the Chicken Pot Pie recipe that's listed here. But, because I don't ever like sticking to a recipe, I changed some stuff up. It ended up looking like this at the end of the night:

Success!
My family inhaled it. And then made me wrap up what was left so they could have leftovers of it tomorrow. That almost never happens. We're not a family of leftovers...mostly because I've perfected the art of cooking for just 4 people.

Just out of the oven
Ingredients:

  • 1 lb. of chicken breast, cut into tiny, bite-sized pieces
  • a spoonful of butter or margarine
  • 3 cups of mixed veg, thawed and drained
  • 1 container of Philadelphia Cooking Creme Italian Cheese and Herb*
  • 2 deep dished pie crusts

Half Eaten
Directions:
  1. Heat oven to 400°
  2. In a skillet, melt butter and brown the bite-sized pieces of chicken 
  3. Add veg and cook through for 2-3 minutes
  4. Add Cooking Creme and heat through until mixture just begins to bubble
  5. Spoon into one deep dished pie crust
  6. Top with the other pie crust (please read explanation below) and cut slits in the top
  7. Bake for 25-30 minutes, until golden brown.
Now, the explanation of step 6:

 The original recipe (the one linked above) says to just put the mixture in a pie tin and then cover with a crust. I don't like pot pies like that. I like my pot pies to be surrounded by crust, both top and bottom. But, when I went to the grocery store, I only got the deep dished crusts and forgot to get the roll out pie "top" that most people would use in this situation. Of course, I could of made the top from scratch, but no. So, after I put the mixture in one pie shell, I ran a knife around the rim of the second pie crust, cutting the fluted edges off and then turned the pie crust tin upside down until it (the crust) dropped out in one nice sheet. I then placed it over my mixture already on the first pie shell and thumb smashed the edges of the two crusts together. Turned out great.

Creamy and flavorful and divine
Of course, it doesn't quite cut into "pie" pieces. But so what. It's yummy no matter what.

Before the massacre.
Enjoy!

*The actual recipe called for Savory Garlic Cooking Creme. My grocery store was out of that flavor, so I got the Italian Cheese and Herb. It was yummy.

Sunday, December 4, 2011

Arroz Mexicano

I love food. All kinds of food. There's just about nothing I won't eat, and I'll pretty much try anything at least once. But one of my all time favorite dishes ever is Mexican Rice. Yes, I'm fully aware that it's probably not "authentic" Mexican Rice when I order it in the restaurants. But I love it anyway.

I've tried to make it a few times with different sorts of recipes. Most of those recipes were massive culinary failures.

Until now.

A successful Mexican Rice

I adapted this recipe from a couple of different recipes. I like how flexible it is.

Ingredients:

  • 1 cup rice
  • 1 small white onion, minced
  • 1 clove of garlic, minced
  • 1 medium sized carrot, minced
  • 1 tbsp tomato paste
  • 2 tbsp vegetable oil
  • 1 tbsp butter
  • 2 cups of water
  • salt and pepper to taste
  • 1/8 tsp celery salt (optional)
  • 1/8 tsp cayenne pepper (optional)
Directions:
  1. In a pan (that you have a lid for), heat oil and butter over high heat until really hot
  2. Add onion, garlic, carrot, salt and pepper, celery salt, and cayenne pepper. Saute for 3 minutes.
  3. Add rice and saute for 5 minutes. You will need to stir this almost constantly. Your rice may start to brown, which is a good thing. (If it doesn't brown, that's ok, too.)
  4. Add water, being careful of the steam that's going to try to smack you in the face.
  5. Drop in the tomato paste and just whirl it around a bit in the rice. Don't completely mix it.
  6. Bring everything to a boil and then turn your stove down to the lowest possible heat setting. (I put mine on warm. If you have a gas stove, you want it low enough that the flame is just about to go out.)
  7. Cover and simmer for 20 minutes.
  8. Remove from heat and let sit for 15 minutes. DO NOT TAKE THE LID OFF AT ALL UNTIL IT HAS SAT FOR 15 MINUTES. If you let the moisture escape, your rice won't finish cooking.
  9. Remove lid, fluff with fork, add any more salt and pepper to taste, and serve.
Sauteing 
Simmering (I cheated and lifted the top. Do not do this.)
My family loves this rice. It's diverse enough to be served with a number of different dishes, so it's very versatile.
And yummy. Don't forget yummy.

Wednesday, November 30, 2011

Better than Sonic

OK, bear with me on this one. I know it's super simple, but maybe...just maybe...it's not obvious to all.

My sister recently pointed out that Sonic is now serving bratwursts. She kept going on and on about how delish they are. And then it occurred to me that maybe she didn't know how simple re-creating the recipe would be. So today, after picking the children up for school, I went to Sonic for a milkshake and to spy on their menu brats. Super simple. Super easy. Super yummy when made in your kitchen and not in a fast food joint.

It didn't take much twisting of the arm to convince my hubby that we needed brats tonight for dinner. Here's how ours looked:

sauerkraut bratwurst
Ingredients:
  • A package of bratwurst (the ones you find in the cold cut/hotdog section of your grocery store
  • hotdog buns
  • spicy mustard
  • a can of sauerkraut (drained and lightly rinsed)
  • a medium onion (halved and sliced)
  • olive oil
  • celery salt
  • salt and pepper
Directions:
  1. In a small pan, drizzle a little olive oil and heat on medium-high heat. Add onions and saute until soft and starting to brown.
  2. In a small sauce pot, heat the sauerkraut with a tiny bit of water (since you drained the original "juice") until heated through.
  3. Grill your brats until they crack and get a little black in places. (I guess you could also bake them or boil them, but grilling them in best.)
  4. Heat the hotdog buns in the microwave (I keep mine in their bag, with the bag open)
Once all of these things are done, just assemble your brat to your liking, sprinkling it with celery salt, salt, and pepper to taste.

WAY better than anything Sonic could come up with and made to taste. How could it not be good?


Monday, November 7, 2011

Thanksgiving Practice

This weekend was full of Crock Pot madness. In fact, on Sunday, I had two slow cookers going at once, something that is a true testament to my slow cooking infatuation. One of those cookers held my apples(auce) recipe previously posted. The other held a Try-Out-Thanksgiving recipe I've been wanting to try before the big day.

If you're anything like me, Thanksgiving is a day of utter chaos in the kitchen. There are so many wonderfully delicious things I always want to cook for my family that I often overdo it and end up with way more on my hands than I can properly deal with. But this year, I've decided to do two things:

  1. Not cook every single Thanksgiving recipe I've ever come across, made, or maybe even head about
  2. Use a slow cooker whenever humanly possible.
So, I happened upon a chicken and dressing recipe that looked simple enough to give it a go, just to see if it was up to Thanksgiving standards. 

Slow Cooker Stuffing Chicken
Ingredients:
  • 2-3 lbs of chicken breast strips
  • 8-10 slices of swiss cheese
  • 1 can of cream of mushroom soup
  • 1 cup milk
  • 1 box stove top stuffing (chicken or savory herb flavor). Yes, I KNOW this is cheating at Thanksgiving. Trust me. I know.
  • 1/4 cup melted butter.
Directions:
  1. Spray the inside of your slow cooker with non-stick spray
  2. Wash your chicken and lay it flat in the bottom of your cooker
  3. Cover with the swiss cheese slices
  4. Mix milk and cream of mushroom soup until creamy and...
  5. Pour mixture over cheese slices
  6. Pour dried stuffing over mixture
  7. Drizzle with butter
  8. Cook on high for 3 hours and on low for 1 hour
  9. Turn your slow cooker lid sideways for the last 30 minutes to let the moisture escape so your stuffing isn't soggy.
As you can see in the above picture, the cheese and soup mixture will bubble up through the stuffing.

The recipe was a success, except for one thing. I don't know if it's Thanksgiving worthy. It's dinner rotation in the Mahaffey house worthy. But Thanksgiving dinner is a big deal, and I'm just not sure it's THAT good. The husband says it is. I'll have to think about it.

To go with the chicken stuffing, I made my garlic roasted brussels sprouts and corn on the cob. We were some happy people!

Sunday, November 6, 2011

Slow Cooker Apples(auce)

My mother recently spent the weekend in the Appalachian mountains for her birthday, and while there she got her hands on some apples. Not just some apples. Massive amounts of apples. Pink Lady apples to be exact. Her garage has boxes and boxes of pretty pink lady apples spilling out of them.

The problem: My mother doesn't cook. She's more of a "heat-it-up" kind of woman. So, she told me I could have full access to all of these apples.

Recently, I came across an applesauce recipe that I thought was pretty interesting, particularly because it was made in a slow cooker. But, I'm not a huge fan of applesauce. It's the consistency. Something about it freaks me out. So I've been trying to figure out how I can work with these apples without making traditional, mashed up applesauce.

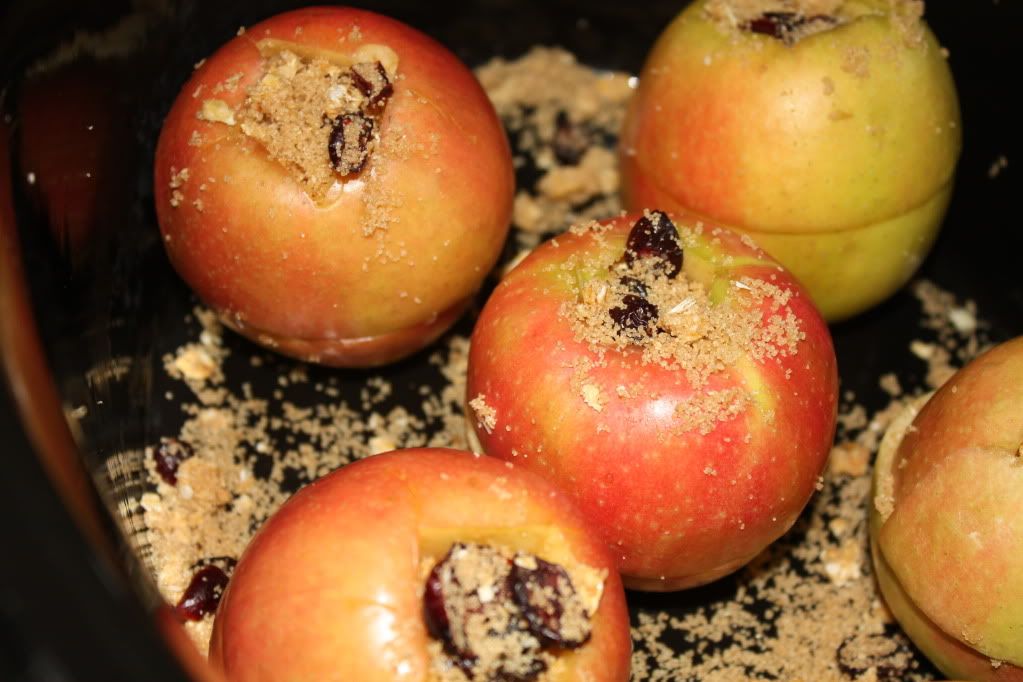
Behold!


This is, of course, before the cooking process. I'm not sure what to call it. Granola Cored Apples? 

Anyway, here's the information.

Ingredients:
  • 6 medium sized apples of your choosing
  • 1/2 c light brown sugar
  • 1/2 cup granola
  • 1/4 cup cranberries
  • 1 1/2 tsp pumpkin pie spice*
  • 1/4 cup orange juice
Process:
  1. Combine brown sugar, granola, cranberries, and pumpkin pie spice in a bowl
  2. Wash your apples thoroughly and then halve them going side to side**
  3. Core the halves using a sharp paring knife. It doesn't have to be perfect. Just get all the middle bits out.
  4. Put the two halves back together, so that it looks like an apple again, and fill the cored middle with your granola mixture.
  5. Place the filled apples in your slow cooker
  6. Pour orange juice in the bottom of your slow cooker
  7. Cook on high for 2 hours and then on warm for 2 hours.
You can then spoon each full apple directly out onto individual serving dishes. Serve with a scoop of Vanilla Bean ice cream.


I can't even explain to you how good this is. It's restaurant quality good. It's close-your-eyes-and-purr good. It's why-did-I-serve-this-in-my-kids-plastic-bowl good.


*If you don't have pumpkin pie spice, you will need 1 tsp cinnamon, 1/4 tsp nutmeg, and 1/4 tsp ground cloves.

**If you have an apple corer, you don't necessarily have to halve your apples. I halve mine for two reasons. First, I don't have a corer. Second, that little break up of apple allows the granola mixture to kind of seep in between the two halves, which I think spices them up more.