Tuesday, May 31, 2011

The "Vintage" Fabric Flower

My mom and I went hat shopping the other day. For her. Not for me, although I really want a fabulous hat. Thank you Royal Wedding for that itch. 

While we were out and about, I kept coming across those vintage fabric flowers. You know, the ones made with chiffon and tulle. They're beautiful and elegant and EXPENSIVE when store bought. So I came home and figured out how to make one for less than $4. And that's pretty awesome, if I do say so myself.


Here's what you will need:

  • 1 yard of chiffon (a color of your choosing)
  • 1 yard of tulle (in roughly the same shade as the chiffon)
  • Needle and Thread
  • Clasp of your choice (I sewed this one to a ponytail band for one of my daughters, but I'm also going to sew a few to pin backs)
A yard of each of these fabrics will make multiple flowers, depending on how big you want your flowers. For this one, I literally put a roll of masking tape down on the fabric, traced the inside circle with a pencil, and cut my flower "petals" out. This size is perfect children. I am also going to go bigger so I can create a hair clip for me. I'll try to remember to post an updated photo of that when I complete it.

First, you will need to cut your "petals" out. They do not have to be perfect circles, and they do not have to be all the same size.  The flower pictured above had 9 chiffon petals and 5 tulle petals.

Starting with a chiffon petal, fold your circle in half:
And then fold it in half again:

Then, with your needle and thread, sew through the tip of the triangle and back again:

From here on, you just add your petals one after another, sewing them together in a circular pattern that overlaps itself. Make sure you alternate between chiffon and tulle so your flower will have some sturdiness and poofiness to it. Once you have all of your petals sewn together, tie your thread off with a double knot. At this point, I also added a circular piece of tulle to the back of my flower, leaving it unfolded, so it could serve as a kind of backer. I found having it there made it easier to sew the ponytail holder to the flower because it kept the flower petals from getting in my way and blocking my view. 

My daughter loved it and had to have it put in her hair immediately.


So cute and cheap!


Monday, May 30, 2011

Super Simple and Delicious Home-Made Lemonade

I have a post coming up soon about jersey knit bracelets. But for now, here's one more home-made "foodie" post.

I love summer in the south. It's one of my favorite times of year. But what I don't love? The humidity. Oh my gah, is it humid here. So, to cool off, my children ask me to make them lemonade. Now, don't get me wrong. I'm a fan of Country Time Lemonade, too, and when I don't have the time, I'll whip up a pitcher of it in a flash. But when I do have time, I like making our lemonade from scratch. Mainly because it's a fun little recipe my children can help me do, and they LOVE helping me in the kitchen.

Here's how you do it:

  • 1 cup of sugar
  • 1 cup of water
  • 1 cup of lemon juice (usually 8-10 lemons will produce this depending on their size. In a pinch, you can use lemon juice from a carton. It's just as good.)
  • 3-4 cups of cold water
First, you need to make a simple syrup. Do this by combining the cup of sugar and the cup of water in a small sauce pot. Heat it until the sugar is completely dissolved. While that is going on the stove, juice your lemons until you get a cup of lemon juice. Then pour your simple syrup, your lemon juice, and your cold water into a pitcher. Put the pitcher in the refrigerator for 30-45 minutes until it chills. 

If it is too sweet for you, add more lemon juice. 

Serve with a lemon slice.


From Start to Finish: Sour Dough Bread

I don't know about y'all, but around here, Sour Dough Bread is just about the best thing ever. I remember being a little girl and my mama bringing home a loaf every now and then from some giving friend. We'd all sit around that loaf in the kitchen, spreading butter on it and eating it until it was only crumbs. As soon as it was gone, we'd wish we'd rationed it out some to last longer than 10 minutes. 

Much, much later, while I was in Grad School, a sweet friend of mine, Melissa, would give my little family a loaf when she thought to. And same as when I was a kid, we'd inhale it.

Recently, my Gran gave me some starter. But of course, I did something wrong almost immediately and it didn't do as it should. So I decided to make some starter myself. After trying out a few different recipes on line, I finally found the one I liked. The one that tasted like the bread from my childhood. (I have no idea where I got the recipe from though! If I discover where, I'll be sure to give credit.)

Now, technically, this isn't "real" starter because it doesn't take months to get going. It's cheat-starter, but the bread is just as good and tastes like the real deal.

Note: Use only glass bowls and wooden spoons for this recipe. Any metal will mess up the mixture.

To Make Sour Dough Bread Starter:

First, in a large glass bowl, mix:
  • 1 packet of Rapid Rise Highly Active Yeast
  • 1/2 cup of warm water
Stir this until the yeast is fully dissolved.

Then, add:
  • 1 cup of warm water
  • 3/4 cups of sugar
  • 3 tablespoons of instant potato flakes
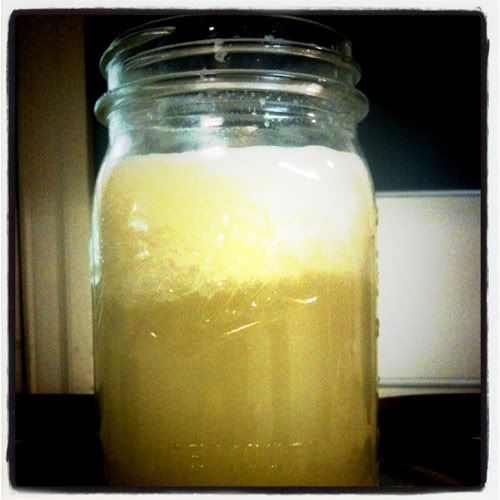
Stir this mixture well until it is thoroughly mixed and pour it into a quart glass jar. Cover the jar with a tea towel or wax paper and let it sit at room temperature for 8 hours.

After 8 hours, put the lid on the jar (make sure your punch holes in the top so the starter can breath. I use an ice pick, but a screwdriver will work just as well.) Put your starter in the fridge for 4 days.


To Feed Your Starter:

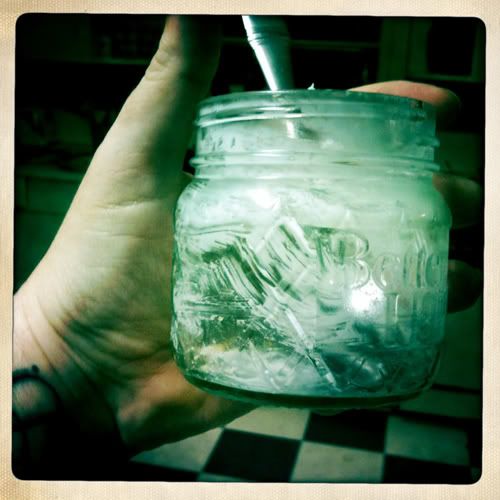
Sour Dough Bread Starter has to be fed every 3-5 days or it will "die," which means no yummy bread. To feed it, add:
  • 1/2 cup of sugar
  • 3 tablespoons of instant potato flakes
  • 1 cup of warm water
Stir the mixture well, and then let it sit at room temperature for 8-12 hours. Stir the mixture again, and remove 1 cup of starter. Put the rest of your starter back in the fridge until the next feeding.

With the removed cup of starter, you have 3 options. You can throw it away, give it to a friend to start their own bread making abilities, or make bread. The 3rd option is certainly my favorite.


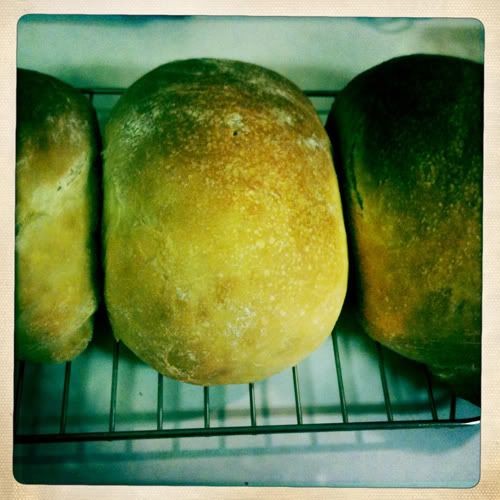
To Make Sour Dough Bread: (This recipe makes roughly 3 medium sized loaves.)

In a large bowl, mix:
  • 1/2 cup of sugar
  • 1/2 cup of corn oil
  • 1 tablespoon of salt
  • 1 cup of starter
  • 1 1/2 cups of warm water
  • 6 cups of bread flour
Mix all of these ingredients in a large glass bowl until your batter is stiff. You can use a fancy mixer with a dough hook, but I prefer doing this all by hand. Remove dough from the bowl, and, on a floured surface, knead dough until firm and elastic. Wash the bowl you previously used, and then grease it well with corn oil. Put the dough back in the bowl, letting it get good and greased on the bottom. Then turn it over so the other side gets good and greased. Cover the bowl lightly with a tea towel or wax paper and let it stand overnight. Don't refrigerate it! I either put mine into a cold oven or the microwave. While you sleep, your dough will rise and be pretty when you wake up in the morning.

The next morning, punch your dough down. You will literally only have to press on it a couple of times to make it thoroughly deflate. Remove dough from bowl, and, on a floured surface, knead your dough a dozen times or so. Again, you can use a dough hook for this, but the palms of your hands work really good, too. Divide you dough into 3 separate parts and place it into sprayed loaf pans. Cover with a tea towel or wax paper, and let them rise for at lease 4-5 hours. (I usually let mine rise all day.)

Bake all three loaves on the bottom rack of your over at 350° for 30-40 minutes. Remove and brush with a little butter if you want, although this isn't necessary. Let the loaves cool completely on a cooling rack. 

And ENJOY!


My family has figured out my bake schedule now, so they miraculously show up at my door on the days I have fresh bread. Be aware of this possible side affect.

Sunday, May 29, 2011

Strawberry Shortcake in a Jar

I've been wondering what my first post on my brand new, spiffy blog would be, and this seems as good as any.

Tomorrow is Memorial Day. During this on-going time of war, it's important that people celebrate for the right reasons. I come from a family of veterans, and while we have been lucky enough to never lose anyone in war, our veterans have lost buddies who fought right next to them during harrowing times. 

So, tomorrow, when my extended family gathers for our cookout, we will be doing so in honor of these buddies. I hope that you will do something similar to honor those who you have known, directly or indirectly.

For the cookout, I was given the job of dessert. I think I was given this job because many of the women in my family believe dessert is the most stressful dish to make because it often involves THE dreaded word: Baking. Little do they know, they are getting nothing baked from this girl.

Behold! The Strawberry Shortcake in a Jar!


When it's hot outside, there is nothing better than strawberry shortcake. 

Here's what you need:
  • 1/2 pint jars (I bought mine at Walmart for $8.)
  • A Package of Shortcakes
  • A Carton of Strawberries
  • A Container of Whipped Cream
  • Sugar
First, quarter your strawberries and sprinkle roughly a tablespoon of sugar on them. Leave them in the bowl to juice a little while you prepare your shortcakes.

Second, crumble all of the shortcakes in a glass bowl. There's usually 6 to a package. Since I filled up 12 1/2 pint jars, I used 2 packages, making it roughly 1 shortcake per jar. You can do more or less depending on your taste for shortcake.

Third, start layering your ingredients. As you can see, I filled mine with a layer of shortcake first. I then put 6-8 quarters of strawberry on top of the cake. Then, I spooned whipped cream on top of the strawberries up to the bottom of the rim. 

Lastly, I spooned some of the juice from the berries over the whipped cream and added one strawberry quarter to the center. It looks like a little heart sitting in a pillow of white.


These can be eaten immediately, but they're really good if they sit in the refrigerator for a little while. All of the juices from the strawberries run down into the shortcake, making it entirely sinful.

And because I knew we wouldn't be able to wait until tomorrow to try it, I made four extra for me, the hubby, and the 2 munchkins. 

I'd say the treat was a success.


Happy Memorial Day, everyone! God Bless our Troops!